Introduction
My house experienced a few power outages in the last few years, worst case lasting about 8 days, but also for shorter periods like 3 to 4 days. We seem to be on a weak part of the grid for some reason, as the local outage map provided by Hydro Ottawa also show a similar disheartening pattern. This prompted me to look into some form of back-up power for these outages.
There are a few houses around here that have solar panels on their roofs, so going to more serious solution than what is presented below may be an option at some point.
My wife and I met a fellow cyclist on the road in July and we talked ‘solar’ for a while as we were riding along. Gord was his name, lives near Trenton Ontario, I’m not saying where exactly to respect his privacy. Prompted by provincial incentives, he sold his 2-year old gas furnace and AC and replaced these with a cold-weather heat pump. In addition, he had a large enough property that allowed him to install ground-mounted solar panels, i.e., not on his roof. “Panels like to run cool, and being installed on the roof causes them to be hotter and not quite as efficient,” he reported. He said he got his best power on a cool sunny day in March, and that his panels had not yet exceeded that peak power level this summer. He has no batteries for storage, gives all his solar power to the Ontario Hydro. He puts more into the grid than he pulls, so he pays no hydro bills. Turns-out he bought his solar gear at the same place I got some items (charge controller, cables, batteries, and advice), https://www.solacity.com/, in Kemptville Ontario, near Ottawa, small world. He said he saved a lot of money by renting a U-Haul and driving 200km and back to pick-up the solar panels himself. He also saved by digging his own cable trench on his property from his solar panels to his house. OK enough back to my story.
With the price of food going up, as a cost saving measure, we tend to buy foods-stuffs on sale, and morph things to soups or stews, and freeze most everything. This is all labour intensive, so the idea was to not lose that labour as a result of prolonged power outages. A secondary motivation was to avoid the sight and prospect of having to deal with a thawing sopping mess in the freezers during prolonged power outages. I got the approval from my wife to proceed.
I could have purchased a small gas powered generator at Home Depot, but was curious about solar power in general and was attracted to a ‘green’ solution.
I opted on a ‘solar generator,’ meaning a small portable solar system that can be stowed away when not needed. This generator provides a single phase 120VAC, i.e., not 240V split phase.
No doubt this ‘solar solution’ will be more expensive than purchasing a gas generator, I predicted. Moreover it was not lost on me that the cost of the food being saved will probably always be less than the cost of the solar system described below.
This post describes the process that I went through to build this generator, including a few mistakes. It is to be noted that the setup described below is tiny, and during power outages precludes the use of anything that creates heat, such as a drip coffee machine (trips my inverter anyways), or even an induction cooktop, such as to save precious battery power to keep our freezers cool. This is helped by the fact that chest freezer will remain cool for a day or two before requiring power, as their contents act like a large freezer pack. In any case, a Coleman stove is called into service for heating food and making coffee.
Other than freezers, I can also use this solar generator to temporarily power my gas-hot water heater (needs hydro to run), my gas furnace (fan, thermostat), basement fridge, and kitchen fridge (more on that later), as required.
In my best estimate, based on recent outages and actual performance, the setup described below should meet my energy needs (read freezer and lighting) for outages lasting from 3 to 5 days, depending on the time of year and the amount of solar radiation. After that, back-up plan B can kick-in, more later.
Solar gear - a quick overview
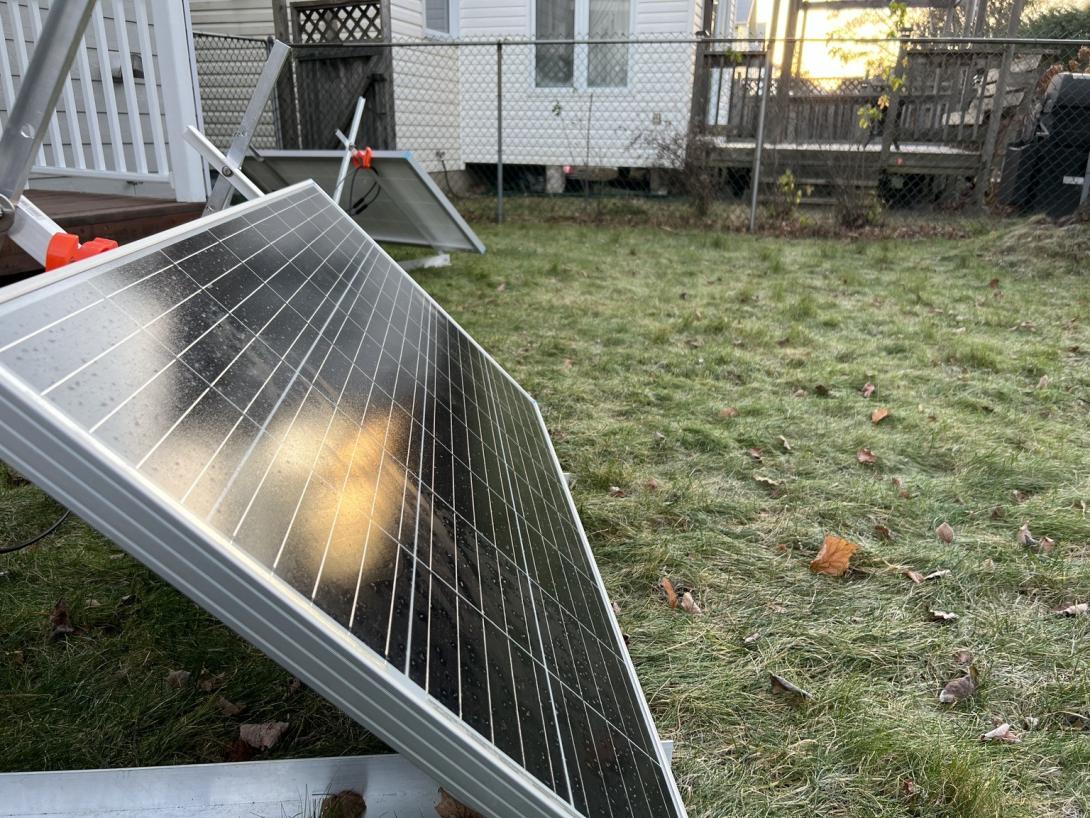
A sketch of my setup is shown below. I initially had one 175W solar panel,
and one 100Ah battery, but I doubled both to be able to withstand longer outages.
Solar setup.
During power outages, I setup my panels in my backyard, and wire them to the
charge controller through a basement window (just behind the irises in the picture
below). I use a solid pink insulation block with two holes in (for the wires) it
to keep the bugs out.
Aluminum mounts allow panels to be angled based on the month of the year, and moved around should they find themselves in the shade.
Back to Basics
The back of my house faces 210° south, which is not bad from a solar exposure point of view. In addition this allows my solar panels to be located safely in the backyard (fenced-in), as opposed to the front yard, so no worries about the things walking away.
Unfortunately there is a rather large linden tree in my backyard, due south and about 20ft. from my back-porch. There is also a crab-apple tree at 230°, 30 ft away. When the leaves are out on these trees, I get morning and afternoon sun somewhere in my yard (not in the same place), but no direct sunlight midday, say from 11AM-ish to 2PM-ish. Is solar a good option, I asked myself?
The short answer was yes, but I had to manage my expectations in terms of what my end-goal was in terms of what to run. One must ask oneself:
- What needs to be powered and for or how long?
- What falls into the ‘would be nice to have powered’ category
- What is the largest panel that I can carry from the basement to the backyard?
- How much money do I want to spend?
- How big and inverter to I need on terms of wattage?
- How much storage capacity do I need?
Load Considerations
Loads must be such as to not to exceed maximum power delivery of the inverter. The lower the load, the longer you will be able to run with a given amount of sunshine.
Refrigerators are special…
One thing that tends to come-up in articles about solar power are refrigerators. Frost-free models (which most are these day) have defrost heaters that power a 570W defrosting element, resistive, after 10-hour of compressor run time. The defrost timer runs the defroster for 21 minutes. This can drain batteries very quickly. Some freezers still frost-up, such as my chest freezers, and these are more desirable for solar systems due to lack of defrost heaters. In addition, some refrigerators operate in fridge mode only; these too probably won’t have defrost heaters.
Inverter selection
The user most decide how much he needs based on load requirements. Also, Google searches results suggest that 1000W is the largest inverter that can be powered from most cars (via booster cables connected to the battery) without risking damaging the car’s alternator/charging system. Also keep in mind the 12V current requirements; a 2000W inverter would need about 170A so cabling from the batteries to the inverter has to handle that.
I opted for a Xantrex PROwatt SW 1000W pure-sine inverter from a local marine store. I failed to notice that the 1000W rating of the this inverter related to its input power, not to its output power, which is about 900W continuous, so I was a bit disappointed about that. Not ideal but still acceptable. This probably qualifies as mistake #1 but in my case it did not matter. Luckily this unit has a surge rating of 2000W for starting motors and other high-inrush loads.
I went for a pure-sine inverter to avoid any power-quality induced issues, especially with electronics. Hooking this inverter to the car would be my backup Plan B should the storage batteries be drained.
Mistake #2 was that this inverter outputs its power via a GFI receptable. This is great for marine applications, but not so great for my installation. More on this later.
Generator Neutral-Ground Bonding
If connecting a generator to the main electrical panel of your house is being considered, one has to deal with the general subject of ‘Generator Neutral-Ground Bonding.’ Here are some links on the subject:
- https://www.electronicshub.org/bonded-neutral-vs-floating-neutral/
- https://www.youtube.com/watch?v=Nrnforx1uFI&ab_channel=RichardVedvik
- https://esasafe.com/assets/files/esasafe/pdf/Electrical_Safety_Products/Bulletins/10-24-2.p
Essentially there can only be one neutral-ground bond in a system, and that normally occurs at the main electrical panel, but not necessarily.
Having said that, my Ontario Electrical Safety Authority (ESA) certified electrician told me the one exception to the code was for bonded neutral generator panels, in which case generator powered circuits can be bonded at the generator.
Panels
There are two types; mono-crystalline, and poly-crystalinne. The mono types are slightly more efficient. My panels are 175W mono-crystalline panels, series-connected, Renogy part No RNG-175D, purchased from Renogy Canada:
https://ca.renogy.com/175-watt-monocrystalline-solar-panel/
Charge Controller
The Charge Controller takes the power from the solar panels and control/regulates the charging of batteries from this power, somewhat similar to smart battery charger for your car. There are two types of charge controller; Pulse Width Modulation (PWM) and maximum Power Point types (MPPT). MPPT is the better type. See https://blog.ecoflow.com/us/solar-charge-controller-types/
I went with a Victron 100V/30A model (MPPT 100/30), allowing me to connect up to 4 panels in series if need be. Victron was well reviewed everywhere I looked, and this product had an IOS phone app to for setup and data-logging, which was important to me. Other models have a built-in screen which always seem harder to use. App connectivity is through Blue-Tooth only, so no off-site monitoring, but no network security concerns.
Batteries
Any deep-cycle battery will do,but lead-acid is one of the few choices should batteries be subjected to freezing temperatures. I deemed lead-acid batteries too heavy and too dangerous for my application, so I opted for LiFePO4 batteries for their lighter weight (and better safety I hope). I selected Battle Born BB10012 LiFePO4 batteries. These are light weight (30 lbs each), and good for 3000-5000 cycles. They have internal electronics called Battery management System (BMS), which provides –based on the brochure– high and low voltage protection, short circuit protection, high and low temperature protection, low temperature charging protection, and automatic cell balancing. These also have an internal heater which I don’t use as the batteries are located in my basement and not in an outdoor shed for example. Only negative is that they are a bit on the expensive side…
https://battlebornbatteries.com/product/12v-lifepo4-deep-cycle-battery/

Inverter, charger, charge controller, and batteries.
Cables
for Panels:
Cables to the panels have standard MC4 connectors, and are rated for outdoors environments. They are a bit stiff but the sun will not degrade their insulation.
for inverter:
One needs high cables capable of handling high currents from the batteries to the inverter. Some tables are available for this, such as this one from Battle Born website https://battlebornbatteries.com/battery-cable-size/:
Panel Mounts
Last action was to build panel mounts for my panels. I got a bunch of aluminum angles from Home Depot, and built my own. I wanted tilt-adjustable contraptions, not too heavy, and again, stowable. I’m embarrassed to say that I paid more for these aluminum bits than for the solar panels themselves… what going on with the cost of aluminum??? Purchasing a finished product would have cost about the same, and I got exactly what I wanted in the end by making them, so I kept reminding myself of that.
In the end I used this tilt-angle calculator:
Charger
The battery charger was the last item purchased for this. It keeps the batteries topped-up at all times. I chose the Victron IP22 for similar reasons as the charge controller:
Charge monitor
I decided not to buy a charge monitor but to simply check the voltage at the battery terminals with a Fluke Multimeter (the voltage is also displayed on the inverter) to estimate the State of Charge (SOC) of the LiFePO4 batteries. When the voltage drops below 12.0V I deem the batteries discharged and shed all loads.
Transfer Panel
Last but not least (costwise), a Schneider Electric/SquareD p/n QOGP3P6036P Generator Transfer Panel was installed by a licensed electrician: https://www.se.com/ca/en/download/document/PHA52731/
Eight circuits were moved from the main panel to this new panel to allow them to be powered from my solar generator. The panel is configured as bonded neutral, meaning generator circuits are bonded at the generator. So the generator needs to bond the neutral and ground wires by design.
Testing my inverter with the newly installed generator panel caused the GFI recetptacle on the inverter to trip. Reaching-out to my electrician, he mentioned that a GFI was not required for this application, and advised my to either disable it, or purchase an inverter with a standard non-GFI receptable. He also mentioned that going with a floating-neutral generator configuration would not be a viable solution either, as any leakage currents in the panel could cause my inverter’s GFI output to trip.
A quick trip to Canadian Tire to purchase a standard receptable fixed this problem. The GFI on the inverter came out, replaced with this new receptacle. And everyting is ESA certified.
Final Words
So that was a lot of money; time will tell if it was worth it. My wife seems happy with the degree of added ‘food’ security so the current answer I think is yes.
Generator Transfer Panel Nema outdoor plug
